-->

petek, 29. marec 2013

SVGCuts Easter Chocolate Bunny

Vesele Velikonočne praznike...

Današnja objava je namenjena vsem dragim obiskovalcem in obiskovalkam
Papiart bloga. Vesela sem, da pokukate na moj blog in se vam zahvaljujem
za vsak vaš zapisan komentar, ki jih zmeraj z veseljam preberem.

Želim vam čudovite Velikonočne praznike in prijetne
trenutke z vsemi, s katerimi jih boste preživljali!

Happy Easter...

Todays post is for all of you, dear visitors of Papiart blog.
Thank you for stopping by and viewing todays project. I also appreciate it,
when you leave me a comment...

Hope you have a wonderful Easter!


Hugs,
Simona


torek, 26. marec 2013

Hanging Monkey

Pozdravljeni dragi/e prijatelji/ce.
Danes delim z vami spomladansko voščilnico, ki je bila
narejena s pomočjo CottageCutz Hanging Monkey (4x6) šablonce.
Želela sem pokazati raznolikost CottageCutz šablon in 
kako lahko uporabite zgoraj omenjeno šablonco za različne priložnosti.
Ko sem prvič videla to šablonco, se mi je zdela kot nalašč za izdelovanje
voščilnic za novorojenčke in otroke. A tokrat sem se odločila,da uporabim šablonco
za izdelavo spomladanske voščilnice... :). Šablonca ima izrez lesene deske, ki je
precej velik in nanj lahko odtisnete tudi večje napise.
Ob izdelovanju te voščilnice sem se res zelo zabavala.

Hello, dear friends. Today I am sharing with you a Spring card,
With todays post I wanted to show how versatile CottageCutz dies are 
and how you can use this die for different occasions. When I saw this die
for the fist time I thought this would be a perfect die to make a card for a baby.
Instead I decided to make a Spring card... :).
 The die comes with a pretty big wooden board on which you can stamp any sentiment.
I had so much fun making this card.


Velikost voščilnice je 15x15cm.
Viseča opica je izrezana iz belega papirja in pobarvana
s Copic markerji. Tudi veja in listi so pobarvani s Copic markerji.

The size card is 6"x 6".
The Hanging Monkey is cut out of white paper and colored
with Copic markers. The branch and the leaves were also
colored with Copic markers.


Krog za visečo opico je bil izrezan s Spellbinders šablonco, 
nato pa suho embosiran s srajčko (po želji) in narahlo
osenčen z distress inki - dried marigold in spiced marmelade.

The circle behind the monkey was cut out with Spellbinders dies,
dry embossed and lightly inked with Distress Inks - dried marigold
and spiced marmelade.


Bseda Spring (pomlad) je bila štempljana z brezbarvno VersaMark
blazinico in potresena z oranžnim embosing prahom (Orange Sherbet).
Embosing prah je nato segret z embosing pištolco, da se prah raztopi.
Uporabila sem tudi oranžen marker s fino konico in z njim
obrobila embosirano besedo Spring.

The sentiment Spring was stamped with clear VesaMark
and sprinkled with orange sherbet embossing powder, then 
heated with the heat gun.  An orange marker
with a fine tip was used to outline the sentiment.


Prav tako sem uporabila luknjač Marthe Stewart, liquid pearls - 
buttercup in ruby red, 2 oranžna razcepka ter oranžen satenast trak iz zaloge.

I also used Martha Stewart punch, some liquid pearls -
buttercup, ruby red, brads and orange satin ribbon from my stash. 


Upam, da ste uživali v današnji objavi.

Hvala, ker ste se ustavili na mojem blogu...
Želim vam en lep dan!

I hope you enjoyed todays post.

Thank you for stopping by...
I wish you all a wonderful day!

Hugs,
Simona

The dies used:


nedelja, 17. marec 2013

Abraham

Lepo pozdravljeni!

Danes objavljam voščilnico, ki je nastala za slavljenca
ob praznovanju 50. rojstnega dne in zelo rad kuha (ne profesionalno).

Pri izdealvi voščilnice sem uporabila CottageCutz šablone, Spellbinders,
Tim Holtz, Marianne Design štampiljko Chef in Vladkino slovensko
štampiljko Vse najboljše. Za barvanje in senčenje pa sem
uporabila Distress Inks.

Hello!

Today I am posting a male birthday card made for a 50th birthday
who loves to cook (but not professionally). 

To make this card I used the CottageCutz dies, Spellbinders,
Tim Holts, Marianne Design Chef stamp and Vladka's slovenian
stamp Happy Birthday. For coloring and distressing I used
Distress Inks.


Hvala za vaš obisk in ogled današnje objave!

Thank you for visiting and looking at my todays post!

Hugs,
Simona

sobota, 16. marec 2013

Oval Doily and Daffodils

Dobro jutro!

Spet sem jaz (Simona) in danes vam bom predstavila voščilnico, 
ki že diši po pomladi in pri kateri izdelavi sem uporabila

Good morning, everyone!

It's me (Simona) again and today I am going to share with you
a Spring card showcasing CottageCutz Oval Doily & Frame (4x6) and


Šablonco Oval Doily sam izrezala enkrat iz belega papirja in enkrat iz
vzorčastega papirja. Notranji del sem uporabila iz bele barve in
ga po robovih osenčila z Distress Inki.

I cut the doily once out of white cardstock and once out of patterned paper.
I used inner part of the doily in white and inked the edges with Distress Ink.


Cvetovi narcis in listi so bili pravtako izrezani iz belega papirja in
pobarvani z Distress Inki.

The Daffodils and the leaves were cut out of white cardstock and colored 
with Distress Inks.


Voščilnici sem dodala nekaj plasti, belo čipko in rumen širši
satenast trak iz zaloge.

I layered the card and added some white lace and yellow sating ribbon
from my stash.


In tukaj je še en pogled na mojo spomladansko voščilnico... :).

And here is another look at my Spring card... :).

I hope you like it!

Hugs,
Simona

The dies used:


sreda, 13. marec 2013

CottageCutz Duck with Egg

Hello everyone!

Danes delim z vami voščilnico, ki sem jo naredila s pomočjo
šablon CottageCutz Duck w/ Egg, ki jo pri nas lahko kupite v
spletni trgovini Mavelu.com in CottageCutz Butterfly Mini.
A ni to pišče srčkano?

Today I am sharing with you a card,
Isn't this duck adorable?


Thank you for looking!

Hugs,
Simona

sobota, 9. marec 2013

Liebster Award

Danes sem od Mojce Soul Sanctuary
in Saše Moj kotiček... prejela Liebster award...
HVALA Mojca, Renata in Saša!

Nagradico pa z veseljem podarjam naprej...


And here is a little about what the award is all about:

This award was designed to be a blog award in the "pay it forward" fashion.
Once you've been nominated, you award it to five blogs that you like
that have fewer than 200 followers, to encourage new
visitors to visit these blogs.

The rules for accepting this award are:

You need to thank the person who gave you the award and link back
to their blog. Posts the award onto your blog. 
Give the award to five bloggers who you appreciate that have 
fewer than 200 followers. Leave a comment on their blog letting them know
that you have given them this awesome award!

Next you need to PAY IT FORWARD!

Imejte se lepo...
Simona

petek, 8. marec 2013

Easter baskets and cards

Pozdravljeni!

Danes se vam bom predstavila z nekaj izdelki za Veliko noč.
V zadnjem času so me navdušile 3D kreacije iz papirja..., zato sem
jim v zadnjem času začela posvečati več časa... :).

Hello!

Today I am sharing with you some Easter creations.
Lately I am really into 3D paper creations... :).


Za izdelavo teh posebnih kreacij sem uporabila

To make this special creations I used

Thank you for visiting...

Hugs,
Simona


sreda, 6. marec 2013

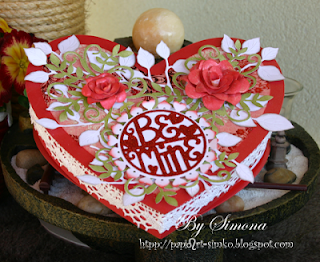
Be Mine Heart Box

Pozdravček vsem!


Simona tukaj s predstavitvijo CottageCutz Be Mine (4x6)
iz Sweet Little Thing release.


Hello everyone!

Simona here with the Heart Box showcasing CottageCutz Be Mine (4x6)
from the Sweet Little Thing release.


Tole škatlico sem želela deliti z vami že za Valentinovo, pa je
na žalost takrat še nisem dokončala. Ampak, sedaj pa sem jo!
Seveda pa lahko šablonco uporabite za veliko drugih priložnosti, 
ne samo za Valentinovo... :).

I wanted to share this project with you for Valentines Day, but
unfortunately I didn't finish the heart box yet.
But here it is now. It can be used also for other occasions, 
not only for Valentines day... :).


Najprej sem iz papirja izdelala škatlico v obliki srčka.
Za okrasitev pokrova škatlice sem uporabila CottageCutz Be Mine (4x6),
Če želite videti, kako sem naredila rožice, kliknite Flower tutorial.


First I made a heart box out of red cardstock.
To embellish the top of the heart box I used CottageCutz Be Mine (4x6),
To see how I made the flower click Flower tutorial.


Šablono CottageCutz Be Mine (4x6) sem enkrat izrezala iz glitter papirja, enkrat pa
 iz belega malce debelejšega papirja. Srčke sem osenčila z Distress Ink - Barn Door.
Šablono CottageCutz Leafy Foliage (4x6) sem izrezala 4x iz malo debelejšega belega
 papirja in osenčila robove listov z Distress Ink - Pumice Stone.
Zelenje je bilo 3x izrezano iz CottageCutz Flourish Layered Flower (4x6) 
šablone iz belega debelejšega papirja in pobarvano z Distress Ink - Peeled Paint.


I cut the  CottageCutz Be Mine (4x6) once out of red glitter paper and
once out of white cardstock. I sponged the edges with Distress Ink - Barn Door.
CottageCutz Leafy Foliage (4x6) was cut out 4x in white cardstock.
The edges of the leaves were sponged with Distress Ink - Pumice Stone.
The greenery was cut out 3x with CottageCutz Flourish Layered Flower (4x6) 
out of white cardstock and sponged with Distress Ink - Peeled Paint.


Za okrasitev stranskega dela na pokrovu, sem uporabila belo čipko iz zaloge.
Za okrasitev stranskega roba na spodnjem delu škatlice pa sem izrezala 2
daljša traka iz belega debelejšega papirja širine 25mm in uprabila
Martha Stewart luknjač. Na to pa sem še uporabila tanjši rdeči svilen trak,
pravtako iz zaloge.

Upam, da sem vas uspela vsaj malo inspirirati...
Hvala za ogled in da ste si vzeli čas ter pustili komentar.


To embellish the side of the top Heart box I used some lace from my stash. 
For the sides of the bottom Heart box I cut 2 long strips out of white cardstock
and used Martha Stewart punch and some red ribbon also out of my stash.

I hope you feel inspired by this project.
Thank you for looking and taking the time to leave a comment.

Hugs,
Simona

The dies used:


torek, 5. marec 2013

Flower tutorial

Pozdravljeni/e prijatelji/ce...
Danes delim z vami tutorial, kako narediš rožico s pomočjo
CottageCutz Sweetheart Flowers, Layered (4x6).

Hello friends...
Today I'll share with you a tutorial how to make a flower with


Potrebovali boste:
CottageCutz Sweetheart Flowers, Layerd šablonco
papir
lepilo
škarje
barvne blazinice za senčenje
svinčnik 

This is what you'll need to make a flower:
CottageCutz Sweetheart Flowers, Layered die
paper - cardstock
glue
scissors
craft ink
pencil 


Najprej izrežete rožice.
Za večjo rožico uporabite 3 izrezke
(največjega, manjšega in še enega manjšega - vsakega po enega).
Ko ste jih izrezali, jih lahko osenčite z barvno blazinico, da rožici
dodate dimenzijo (ni pa nujno).

First you will cut out the flowers.
For the larger flower (photographs) you have to use three petals
all together (the largest, one smaller and one even smaller).
Once cut out ink the edges to give some dimension to the flower.


Dve večji rožici prerežite na pol, nato pa še le-te enkrat na pol.
Dobili boste 2x po 4 dele, kot kaže slika spodaj. Najmanši cvet pa
zrežete s škarjemi v krogu, kot prikazuje slika spodaj.

Cut 2 of the largest petals in half and then in half agin. 
The smallest petal you cut with scissors in circle as shown on the picture below. 


Na spodnji sliki je prikazano, kako zarežete s škarjami vsak srček posebej.
S svinčnikom ali pa s kakšnim drugim orodjem pa lahko podvihate cvetove.

Cut the slits on each petal (see the picture below).
With the pencil or some other tool round the petals.


Na konico srčka dajte malo lepila, prekrižajte in zalepite.

Put a dot of glue as shown below and cross and glue it together.


Tako boste dobili 4 velike srčke, 4 majnše srčke in rožico.
Zalepite skupaj vse 4 velike srčke v en cvet.
Enako naredite z manjšimi srčki. Pomagajte si
s spodnjimi slikicami za referenco.

You will end up with 4 bigger hearts, 4 smaller hearts
and a middle flower.
Glue all 4 bigger hearts and all 4 smaller hearts together
as shown on the picture below.


Ko ste vse zlepili in so se svetovi posušili, dajte malo lepila na sredino
največjega cveta ter nanj zalepite manši cvet. Nato pa še
na manjši cvet zalepite rožico.
Voila...uspelo vam je!!

Once glued together, put a little bit of a glue in the middle of the bigger flower
and glue the smaller flower on top of the bigger flower.
Then glue the center flower. 
Voila...you did it!!


Pa še rožica od blizu.
Upam, da boste poskusili in naredili nekaj teh rožic.
Le-te bodo izgledale čudovito na katerem koli izdelku.

Here is a close up picture from the flower. 
I hope you will give it a go and make some of these flowers.
They are going to look great on any project.


Have fun!

Thank you for stopping by...

Hugs,
Simona

01 09 10